Monday, February 11, 2013

Nursery Progress

Remember this progress post were the future nursery had NOTHING done on it but a painted dresser?
Yeah well, SURPRISE! More got done!

Here is a before so you don't have to go all the way back to the bottom of that link to see what it looked like before.
Here is what it currently looks like.
Okay, so it still looks like a hot mess... just a different/less organized hot mess but as any DIYer knows, it often looks worst before better. You can see here that I DID move the dresser over so it no longer blocks the window.

Surprisingly a lot has been done in that tornado of a room! Here are a few closer looks to see what’s going on so far.
The biggest difference is that Hubby and I painted the walls a soft buttery yellow, my Man also drew this mural on the wall (that the crib will soon go on) with a gold paint pen! We are currently working on painting leaves onto it with a stencil and some paint we picked up at the craft shop. You can also see in the photo that the crib has been painted (it was not put together in the far right corner of that top photo and brown) and put together. My sister helped us with that when she came for a weekend and got shafted to the "future nursery room labor crew". Hey, I have no shame, if you come over now expect to be painting, or sewing, or building SOMETHING for this room. :P

Here is a closer look at the tree.
It looks a little like a late fall tree that has lost 80% of its leaves but trust me, it will get filled in more soon. You can't tell in the photos but I love how the window on the other side of the room makes the gold paint shimmer. This is my favorite part of the room so far.
On the other side of the room is this antique toy stroller Hubby and I found for $10 at a yard sale! I love the retro look it has and the color! It needs a little love though because the top part likes to come off the rest of it. I have planes to use it to hold some stuffed animals I've been hording away since my childhood.
On top of the stroller is the mobile me and my sister made. The entire mobile cost me $5 because I used scrap fabric I had on hand that went with the room, went outside and picked up free sticks, already owned hot glue and was given an entire spool of fishing line. The only thing I had to buy was the filling for the birds!
If you want to make your own, I got the planes for the birds here and it looks similar to this once it’s hanging up. This video was also a big help for me because I'm a ditz and was just NOT understanding the pattern. A.

We also finally got around to getting some art framed.
This painting is one I painted a while ago and was just so excited to use in this room, the other is a page from an antique story book that we snagged at an antique shop for $20 pre-matted. Because one of the pieces I did, and because they were having a buy one frame get another free sale at the craft shop, this little project only set us back $75, which, if you know how much frames can run, is a great deal!
The last thing that we have to hang is this reading tent that I made.
It looks just like a pile of fabric on the floor right now but it’s actually fully made and just needs to be hung up with some pillow tossed under it and maybe a blanket to transform into a sweet little play/reading tent for the bean. When all hung up it will look something like this...
Minus the lights and top part. It’s just a hula hoop that I wrapped in white wool yarn (that I already had) so the blue hoop wouldn't show though, and sewed some sheer white chiffon I snagged on sale onto. The whole thing cost me $35! The one in the photo above uses PVC pipes (which generally cost more than a $5 hula hoop) and old curtains slipped on top (which is great to reuse if you have any... I did not). All the curtains I liked were around $30 EACH and I would have needed two, so it would have cost me around $70 if I made it this way. Instead, I snagged some amazingly luxury look chiffon for two bucks a yard and got a TON of it so it would billow nice and full and flowy on the floor and it STILL cost me cheaper than if I had bought the curtains! So, lesson learned. Sometimes it’s worth the hassle of sewing to get a better price and nicer look in the end.

Also, just for an idea of the theme we are going for in this space, here is a mood board I created a while back on this post
So here's the break list from this post with everything done marked off....
*paint
*move giveaway/ sell stuff from corner and GET RID OF IT!
*Organize storage stuff in the closet
*Put crib together
*get a sleeper sofa
*create a reading/play spot for Baby (almost done)
*add art
*hang art
*get a night stand for guest couch/bed
*add more lighting
*make curtains (not shown in the post but ordered! :D)
*make a mobile for the crib
*paint the crib white
*add decor (needs to be put up still)
*add bookshelves for storage
*create a changing area by/on the dresser
*move the dresser somewhere better
*mount the leaning mirror (on the dresser) to the wall to make it baby safe.
So, as you can see, a LOT has been done but there is still quite a bit to get done.
Things are moving along quickly and I expect to have another progress post up soon enough. Hopefully less stuff will be on the floor and more things actually hung in the next one! :D

So what have you all been up to? Building any fun stuff, how major projects? Are you doing a full reno or just an update? What are some great steals or deals you've scored of late? Anyone else adventuring into the world of sewing or are you an old pro by now? Would love to hear from you.

Little updates

So it turns out, the person who was in charge of doing the photography for the shower has yet to send me the photos :( so this means no shower photo dump or post. *sigh*
On a good note, I and the Hubby have been up to our eyeballs in projects (mainly for our Buttons room). I'm so excited to share with you all what is going on in there and what I'm up to this year for Valente’s day too! Both of which, I'm going to be writing a separate post for.

I should get one up about our Buttons room today so keep an eye out for that.

Thursday, January 17, 2013

Your Invited!

You are all virtually invited to our little Buttons baby shower!
I am so excited about sharing this with you all and I can't wait to photobomb this blog with shower related photos and all the sweet details of this amazing day that my two awesome sisters (and mom) have planned for me! Thank you all for sharing this part of my life with me. I love you all and am so blessed to have you as readers! <3

Monday, January 14, 2013

Bump

Yesterday, my amazingly talented sister did a maternity photo shoot with me and the Hubby!
Here are a few of my favorites she took.


Yeah, we are goobers. Button is going to be one unique (read odd) little boy, just like his mommy and daddy :P.
Thank you Sissy for doing such an amazing job and having fun with us on the beach. You rock my socks!

Tuesday, January 8, 2013

Bathroom Progress

 I have been one busy bee of late! Now that our little Button is getting closer to his due date, I have been going a little crazy trying to get the house in shape before he gets here (and for him).
Though I have hardly touched what will soon be the nursery/ guest room, I HAVE been up to quite a bit of painting, crafting, and organizing. I'm hoping to post about each project as they get done.
Here are the one (out of many) projects I HAVE gotten done.
It's so nice to walk in there now and see something other than off-white on the walls! I LOVE the new color. Its called Free Spirit by Olympic.
 Such a nice soft blue to really brighten the place up and make it feel crisper!
My original idea was to go with this shower curtain from Bed bath and Beyond but Hubby vetoed that idea right off the bat because he is NOT a fan of ikat. On top of that, I wasn't to keen on the $40 price tag. So, the search continued;
that was until we found this beauty at Sears for... wait for it... $20! HALF the price of my original idea and has the same ornate feeling and colors (if you replace the red for orange) in a non-ikat pattern! It was totally meant to be!
On top of adding a new shower curtain, I also got some cheap art for the wall.
Thanks to a Christmas gift card to Michael's, I was able to snag this wooden picture frame for $7. After a couple of coats of white paint, I just hung it on the wall and then added little hooks on the inside of it for all my necklaces. 
 The best part is, this entire project was only $7 and I get instant art, instant charm, and instant no-more-tangled-unorganized-necklaces!
This is the best part of painting the bathroom! Not much is cuter than a little kitten with blue paint on the ears (by the way, that's a pistachio shell she brought to me and was playing with while I worked... so cute).
This would have to be the second best part of painting the bathroom. Hubby making a run to Starbucks for me so I could keep my tired prago butt moving on the job. The second Starbucks cup (in the background) was full of water FYI. ha, no chain coffee drinking here :P (if you want to know what all the gibber means on the side it’s a skim cinnamon dolce latte mocha no whip ;) ).

 Here is the rest of the bathroom when it was finished.
I don't like how this photo makes it look a little green. The wall color has NO green in it -.-. 
And just so you don't have to go back to this post, here is a before and current so you can see the big difference a bit of paint and a little touch up can do. :)
So this is how the progress list looks now!
*paint
*create a fo-frame for the sink mirror
*hang art
*add more art
*get a bath mat
*change shower rod to something nicer
*get baskets for storage under the sink
*organize everything better under the sink
*change light fixtures (maybe)
There is still a good bit of things to be done but I'd say this is a good step in the right direction.
What do you all think? Anyone else painting a lot these days? how about getting a great deal on something?

Tuesday, December 4, 2012

Christmas Count Down

As I mentioned on this post, I have been working on a little surprise.I even gave you guys a little preview photo

 Well, SURPRISE!
After looking at a ton of DIY ideas online and scouring though pinterest photo, I found this little bit of inspiration
What I liked most about them was the white with a bit of red and red numbers. The only down side? they are from Land of Nod, and at almost $50 for 25 little bags, I was just not willing to bight the bullet and get them (they are on sale now for $36, still WAY more then this entire project cost me!). So, instead I set out to make my own and I'm going to show you how (even though its a little late, you can just eat the past day's candies now ;) I won't tell, promise). 
Here my tutorial in photos!

Step 1.
Create a lay out for your bags on contact paper. 
 See the line down the center? That's my making to see where the fold will be for the bags. Make sure you make the template large enough to allot for a little seam room all the way around and will be as big as you want it to be once you fold it in half. Once you make your template cut it out and remove the sticky contact paper. Apply the contact paper to the fabric you are using for you bags (I used left overs from my winter wreath project), and cut around it. Remove the contact paper and repeat 25 time (25 days of Christmas, remember).

You will end up with a pile like this.
 Fold each rectangle in half and iron it down so you have a nice square. Its okay if the edges don't line up perfectly, trust me, I'm no sewing expert, all my bags are slightly different shaped (even AFTER using my template!). Just try to get it lined up as best as you can.
 Sew around the edges of the square (minus one, this will be your top) making sure to leave a little room on the sides. Leave about half an inch to an inch below the top un-sewed. This is where your draw string is going to go.
 When sewing around you bag, make sure to back stitch where you started and ended so that your stitching does not fray and come undone.
 Now fold over the half inch-inch you left at the top and iron it down so that the top lines up with the edge of your stitching.
Now take some thread of your choice and sew around the bottom of your fold. I like to knot the end so that it doesn't fray later. Make sure you go all the way through to the center of your bag but not though BOTH sides or you will end up sewing your bag closed from the inside! 
 I decide to hand stick this because I like the uneven stitched look (reminds me of little elves) but if you do not want an uneven stick, you can fold over your fabric and iron it BEFORE you start stitching around your bag, then sew it down using the machine; then fold over the your fabric in half, iron down, and fallow the rest of the steps as normal. This will give you a nice straight stitch.

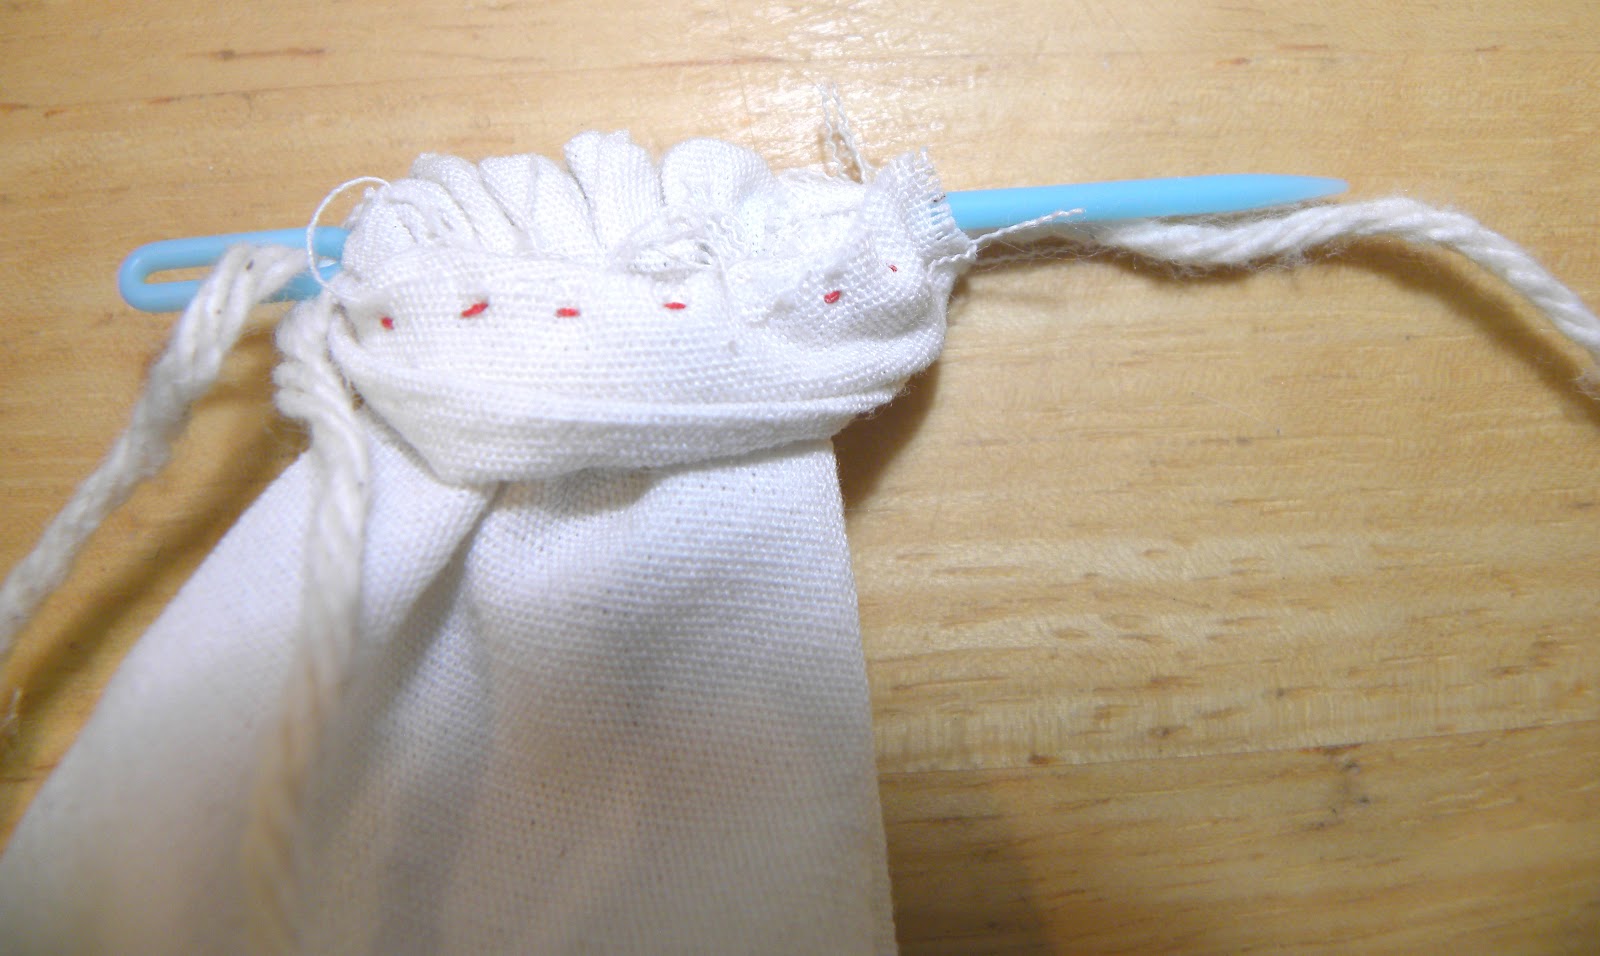
 Next, use a very small crochet needle or very large sewing needle and thread yarn though it. If you like the look of a thicker thread you might also be able to use some small satin ribbon. I just used what eve I had around that matched.
 Thread the needle and yarn though one end of your bag and though to the other end. I had a little trouble with this part because my bags were so small so I ended up threading it halfway though, then under a stitch, back up the stitch, and finished the thought the other half, because my stitches were far enough apart. (Not sure if that makes much since but hope it helps if you have the same issue)
 Turn your bag outside in and wala! You have a little treat bag; now do this 24 more time. lol
Once you are done making all your bags, you can add your numbers. I found a style I liked online, printed out 0-9 and then used an exact-o blade to cut the numbers out. If you don't feel like doing this part, there is always a great selection of number stencils at craft stores. I'm just cheap and didn't feel it was necessary.
 Using craft paint that I already had on hand, I used a small sponge applicator to dab over the number cut outs and onto my bags. (Ignore the brush in the photo; I used it to get to the bottom of the little jar because my sponge wouldn't fit.) DO NOT use a brush! The paint will go on to thick and soak though the bags and leave a hot mess! Use just a little paint on the tip of you sponge applicator (you can get them for about a dollar at any craft shop) and dab it on carefully, making sure it doesn't go all the way though you fabric. If you like, you can also use a small piece of card stock or cardboard between your bags to make sure it does not go all the way though. 
Once you are all done with your painting, you will have little count down bags! YOU DID IT!
Now you can hang them on a long branch (even spray paint it white or red, or sparkly!) or where ever you want them! Hubby helped be create a board to hang them from for a more orderly look. 
To make the board, we just bought a large piece of wood (not particle board because it will drink up any paint you try to put on it) and nailed some nails in.
Then we just spray painted it with red paint (I already had on hand) and BAM!
A Christmas countdown board that cost me at total of $9! ( $1 for red thread and $8 for the wood board!)So much better then almost $50 (or even $35!). Hope you all enjoyed the little tutorial!