Tuesday, December 4, 2012

Christmas Count Down

As I mentioned on this post, I have been working on a little surprise.I even gave you guys a little preview photo

 Well, SURPRISE!
After looking at a ton of DIY ideas online and scouring though pinterest photo, I found this little bit of inspiration
What I liked most about them was the white with a bit of red and red numbers. The only down side? they are from Land of Nod, and at almost $50 for 25 little bags, I was just not willing to bight the bullet and get them (they are on sale now for $36, still WAY more then this entire project cost me!). So, instead I set out to make my own and I'm going to show you how (even though its a little late, you can just eat the past day's candies now ;) I won't tell, promise). 
Here my tutorial in photos!

Step 1.
Create a lay out for your bags on contact paper. 
 See the line down the center? That's my making to see where the fold will be for the bags. Make sure you make the template large enough to allot for a little seam room all the way around and will be as big as you want it to be once you fold it in half. Once you make your template cut it out and remove the sticky contact paper. Apply the contact paper to the fabric you are using for you bags (I used left overs from my winter wreath project), and cut around it. Remove the contact paper and repeat 25 time (25 days of Christmas, remember).

You will end up with a pile like this.
 Fold each rectangle in half and iron it down so you have a nice square. Its okay if the edges don't line up perfectly, trust me, I'm no sewing expert, all my bags are slightly different shaped (even AFTER using my template!). Just try to get it lined up as best as you can.
 Sew around the edges of the square (minus one, this will be your top) making sure to leave a little room on the sides. Leave about half an inch to an inch below the top un-sewed. This is where your draw string is going to go.
 When sewing around you bag, make sure to back stitch where you started and ended so that your stitching does not fray and come undone.
 Now fold over the half inch-inch you left at the top and iron it down so that the top lines up with the edge of your stitching.
Now take some thread of your choice and sew around the bottom of your fold. I like to knot the end so that it doesn't fray later. Make sure you go all the way through to the center of your bag but not though BOTH sides or you will end up sewing your bag closed from the inside! 
 I decide to hand stick this because I like the uneven stitched look (reminds me of little elves) but if you do not want an uneven stick, you can fold over your fabric and iron it BEFORE you start stitching around your bag, then sew it down using the machine; then fold over the your fabric in half, iron down, and fallow the rest of the steps as normal. This will give you a nice straight stitch.

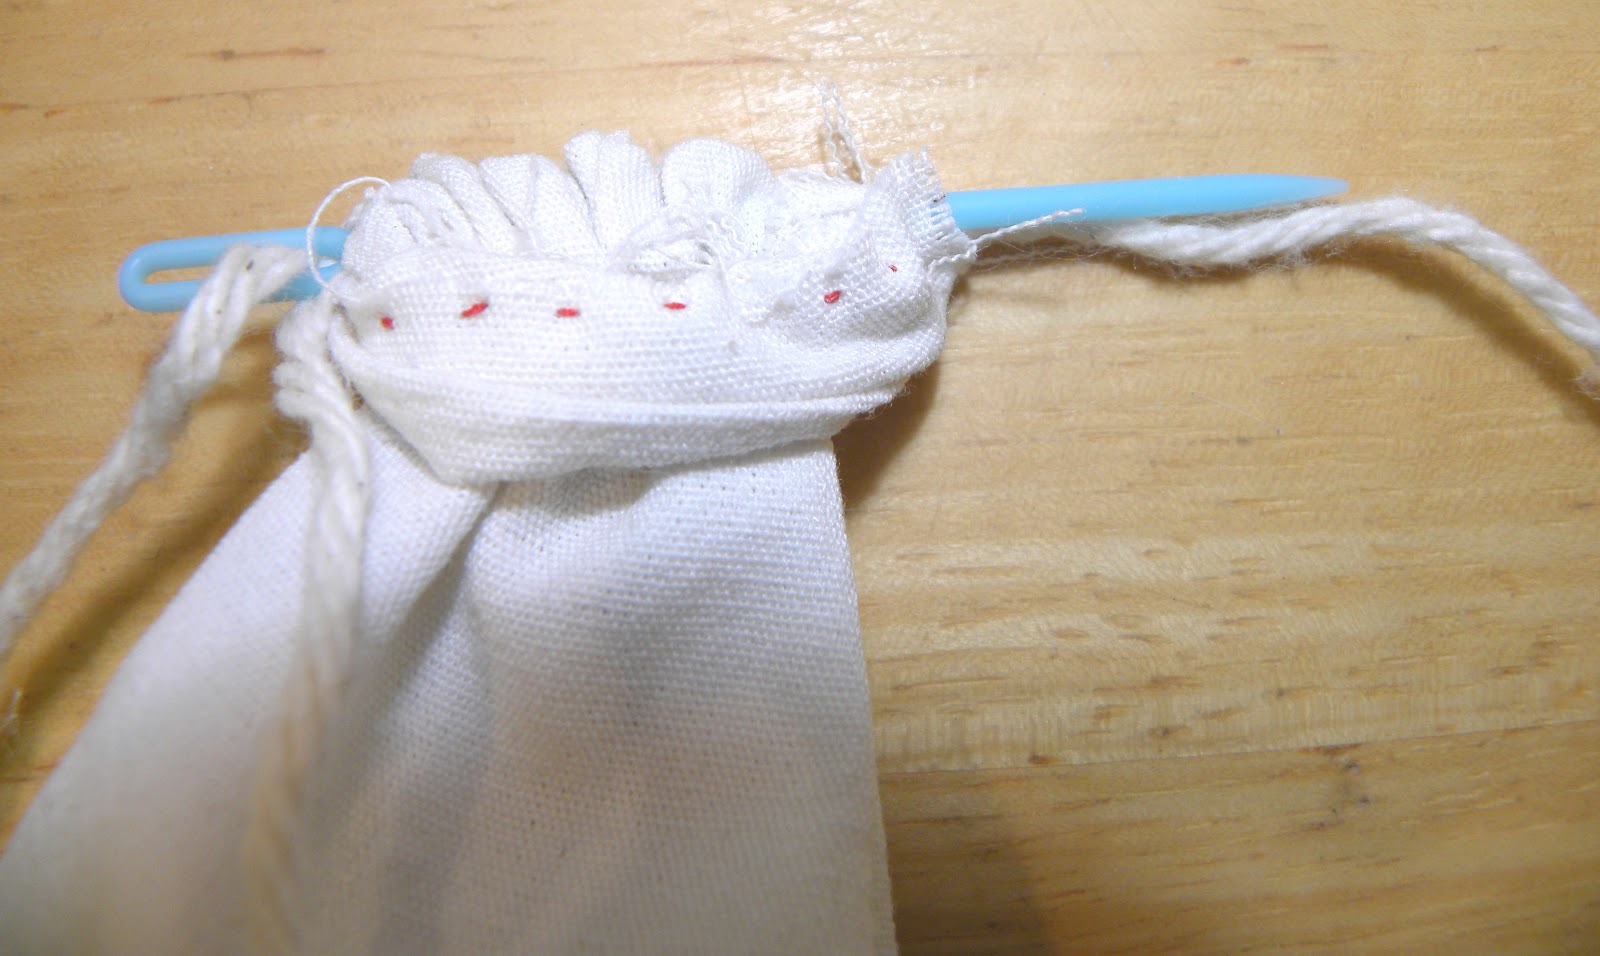
 Next, use a very small crochet needle or very large sewing needle and thread yarn though it. If you like the look of a thicker thread you might also be able to use some small satin ribbon. I just used what eve I had around that matched.
 Thread the needle and yarn though one end of your bag and though to the other end. I had a little trouble with this part because my bags were so small so I ended up threading it halfway though, then under a stitch, back up the stitch, and finished the thought the other half, because my stitches were far enough apart. (Not sure if that makes much since but hope it helps if you have the same issue)
 Turn your bag outside in and wala! You have a little treat bag; now do this 24 more time. lol
Once you are done making all your bags, you can add your numbers. I found a style I liked online, printed out 0-9 and then used an exact-o blade to cut the numbers out. If you don't feel like doing this part, there is always a great selection of number stencils at craft stores. I'm just cheap and didn't feel it was necessary.
 Using craft paint that I already had on hand, I used a small sponge applicator to dab over the number cut outs and onto my bags. (Ignore the brush in the photo; I used it to get to the bottom of the little jar because my sponge wouldn't fit.) DO NOT use a brush! The paint will go on to thick and soak though the bags and leave a hot mess! Use just a little paint on the tip of you sponge applicator (you can get them for about a dollar at any craft shop) and dab it on carefully, making sure it doesn't go all the way though you fabric. If you like, you can also use a small piece of card stock or cardboard between your bags to make sure it does not go all the way though. 
Once you are all done with your painting, you will have little count down bags! YOU DID IT!
Now you can hang them on a long branch (even spray paint it white or red, or sparkly!) or where ever you want them! Hubby helped be create a board to hang them from for a more orderly look. 
To make the board, we just bought a large piece of wood (not particle board because it will drink up any paint you try to put on it) and nailed some nails in.
Then we just spray painted it with red paint (I already had on hand) and BAM!
A Christmas countdown board that cost me at total of $9! ( $1 for red thread and $8 for the wood board!)So much better then almost $50 (or even $35!). Hope you all enjoyed the little tutorial! 

Thursday, November 29, 2012

Progress

Now that we are starting to be a little more moved in, I think it about time to share our home (for the next few years) with you all!
To help jump start my motivation, I've decided to do a 'progress' post. Hopefully this will keep me on track with what needs to be done and all of you on track on what going on.

First things first, the living room!
The Hubby and I have already painted this room and are so happy with the walls a nice bright color. The Yellow is actually slightly lighter then in this photo though (it looks most like the right wall in the corner). The room is a hot mess, I know. So here's the long list-o'-things-to-do (I'm not numbering them because I feel that might put a limit on what I'm willing to work on next on the list and any/everything needs to get done so there is no real order to this list; just a way to get share what we have plans for). 

*paint
*hang art
* New love seat
*curtains for the window (DIY maybe)
*better organization for the office space (shelving or a new desk maybe)
*new desk chair
*paint the mirrors on the wall white
*reupholster the chair in the corner
*add a storage ottoman (DIY maybe?)
*add a rug to anchor the two different spaces
*add a fireplace mantel (this is an apartment so we can not add a true fireplace) to take up the other wall (not show in the photo above) and add focus for the sitting area
*add more art
*paint the buffet cabinet (behind the couch) white
* get a bench for the entry way (left corner of the photo)
*paint font door (maybe)
*paint the trim and window frame a crisper white 
*find a permanent/ doggy proofed place for the kitties food (not on top of a box on a chair!)

Being that we live in an apartment, there ARE some restrictions so there is only so much we can do but luck for us, we are allowed to paint. Just a side note before getting to the next room, the up stairs bathroom.


*paint
*create a fo-frame for the sink mirror
*hang art
*add more art
*get a bath mat
*change shower rod to something nicer
*get baskets for storage under the sink
*organize everything better under the sink
*change light fixtures (maybe)

This is our upstairs hallway we already have some progress done in this area as well but, as you can see, its still a mess and needs some picking up for sure!
*remove closet door to change it to a book shelf
*paint
*get art for the space
*do something to accent the book shelves
*add a reading chair (maybe) where the boxes are
*change lighting ( so not a fan of boob lights. Anyone else call them that?lol)

Here is the soon-to-be nursery/ guest room!
*paint
*move giveaway/ sell stuff from the corner and GET RID OF IT!
*organize storage stuff in the closet (on the left)
*put crib together
*get a sleeper sofa
*add a rug
*create a reading/play spot for Baby
*add art
*hang art
*get a night stand for the guest couch/bed
*add more lighting
*make curtains
*make a mobile for the crib
*paint the crib white
*add decor
*add book shelves for storage
*create a changing area by/on the dresser
*move the dresser somewhere better
*mount the leaning mirror (on the dresser) to the wall to make it baby safe.

Well, that is it for now. I still have our bedroom, the kitchen, downstairs half bath, and dining room to make a post on but I felt like not overwhelming you all (or myself) with long to-do lists. Hope you all enjoyed the mini walk though. Hopefully I will have the rest of the rooms up sometime this coming week and maybe even a progress photo... who knows, a girl can wish. :P
Hope you all have a wonderful and productive weekend and have lots of fun! <3

Saturday, November 24, 2012

Caramel Apple-Cherry Pie

Normally I'm a big fan of trying homemade recipes over magazine recipes. There is just something so warming about a tried and true, carried down classic but this Thanksgiving I dared to do something a little different.

After seeing this pie in my Better Homes and Gardens magazine, I was set. You see, I HATE pumpkin pie. yeah, I know, I've just lost any devoted reader here but hear a girl out. I love pumpkin; pumpkin soup, pumpkin bread, baked glazed pumpkin but me and pumpkin pie just don't see eye to eye. So, in fear that that may be my only option during the most pumpkin-pie-consuming-day-of-the-year, I decide to make something else. That's when I found this recipe. It's a bit time consuming and a little more complex than you're everyday pie but it's amazing! Its a completely new take on an apple pie that I will DEFINITELY be making again! It was such a hit that even with four other desserts there, I walked away from Thanksgiving with no more than two slices worth! I'd say that's a success! So thank you BHG for making me a fan of new and "improved" recipes.
You can find it here, were you can print it and save it for your next holiday gathering but I am also listing the recipe below for all you people who gotta have it RIGHT NOW! want to copy it to a card ;).
Enjoy! <3
You will need: a rolling pin, one large and one small saucepans, two medium, two small, and one large mixing bowls, a slotted and non-slotted spoon, a deep pie dish, a cooling rack, a food processor, parchment or foil, baking sheet,pastry brush, cutting board, knife, a greater, and a fork

Pie Crust:

  • 2 Cup Flour
  • 1 Cup unsalted butter, cut into small pieces and chilled in the freezer
  • 1 Tb. spoon sugar
  • 1 T spoon salt
  • 1/2 Cup ice water
  • 1 T spoon lemon juice
  1. In your food processor combine the flour, cut butter, sugar, and salt. 
  2. pulse just until it resembles coarse cornmeal.
  3. in a small bowl combine the water and lemon juice. 
  4. slowly and gradually add the water to the flour mix while pulsing the food processor, just until a dough comes together. DO NOT over mix!
  5. Just when you are able to form it into a ball, form the dough into three equal sized balls. 
  6. combine two of the dough balls to form one larger one and refrigerate both balls. 
For pie:

Cranberry cherry compote filling:
  • One 12 oz. bag of fresh cranberries
  • 1 Cup sugar
  • 1/4 freshly squeezed orange juice (about one orange)
  • 2 T spoons finely shredded orange peel (about one orange)
  • 1 Cup frozen cherries (defrosted)
  • pinch of salt
  1. In your small saucepan, over medium heat, combine the cranberries, sugar, orange juice, orange peel, and a pinch of salt.
  2. cook until the cranberries begin to burst and the sauce begins to thicken. stir occasionally.
  3. mix in the cherries, cover, and remove from heat. 
  4. Allow to cool.
For caramel apple filling:
  • 8 baking apples, cored and cut into small pieces
  • 2 Tb. spoon lemon juice
  • 1 Cup packed dark brown sugar
  • 1 T. spoon lemon peel
  • 1/4 Flour
  • 1 T spoon cinnamon
  • 2 TB. spoon unsalted butter
  • 1/4 Cup whipping cream
  • 1 T. spoon vanilla extract
  1. In a large mixing bowl toss the apples with the lemon juice and lemon peel.
  2. In a small bowl combine the brown sugar, flour, cinnamon, and salt. mix well.
  3. toss the apples with the flour mixture using a spoon to coat all. 
  4. melt the butter over medium heat in a large sauce pan. 
  5. Add apples and cook until apple are tender (about 5 min).
  6. Add in the whipping cream and vanilla. 
  7. continue cooking and stirring often until sauce thickens and apples are tender. (about 5 more min)
  8. remove from heat.
For pie: 
  • 1 egg
  • sugar
  • pie dough 
  • uncooked rice or dried beans
  • fillings
  1. preheat oven to 375 F.
  2. roll out the larger ball of dough onto a well floured counter or cutting board.
  3. place rolled dough in the pie dish and press gently into edges.
  4. cut off excess dough from the lip of the pie dish leaving 3/4s of it covered with dough.
  5. using you finger, smooth the edges of the dough, prick the inner sides and bottom of the dough with a fork (this will prevent rising and allow steam to escape the dough as it cooks).
  6. take you foil or parchment, place under the pie dish and take out the bottom. 
  7. cut parchment or foil to fit, place beans or uncooked rice in the bottom of the pie dish.
  8. Chill the pre-made dish in the refrigerator for 20 min. 
  9. while the dough chills, remove the other ball of dough from the fridge.
  10. roll it out in a long sheet (if you are making a basket weave).
  11. With a knife, cut down the dough to make long strips ( it doesn't matter how many you make as long as you end up with and even amount). 
  12. with the left over down, use a cookie cutter or knife to cut out seasonal cutouts (Hubby and I made leaves and acorns but anything would look good). 
  13. place dough strips and cutouts on a cookie sheet and return it to the refrigerator.
  14. remove your prepared pie dish from the fridge and cook it on the middle rack of the oven for 20 min.
  15. remove pie crust from oven, remove the beans/rice and parchment/foil.
  16. return the crust to the oven for another 5 min. or until its golden.
  17. remove and let cool.
  18. when the crust is cool, layer in the one third of the cranberry compote into the bottom of the pie dish, fallowed by half of the apple filling. 
  19. dollop on another third of the cranberry compote, fallowed by the apple filling, repeat with compote. 
  20. remove the remaining pie dough from the fridge.
  21. Whisk together the egg and about 2 Tb. spoons of water. 
  22. brush the edges of the pie crust with the egg. 
  23. create the top crust by weaving the dough strips. Press the edges of the strips into the crust and cut off any excess. 
  24. Layer on the cutouts and coat all with the egg mix.
  25. generously sprinkle on sugar.
  26. bake for 40 min. on the middle rack. place the cookie sheet on the bottom oven rack to catch any dips.
  27. remove from oven, cover the pie edges with foil (to prevent over cooking) and return to oven for 5 more min. or until the pie is golden brown.
  28. let cool for at least three hours before serving.

Thursday, November 22, 2012

Thankful

Happy Thanksgiving all! <3 I am so thankful to have you all and the honor of getting to be a part of all of your lives. Thank you so much for sharing this life with me and for reading! Today, there is so much to be thankful for and most of all I am thankful for my child. Here is a little treat to share my joy with you all!

Happy Thanksgiving, be safe in your travels, indulge in the food, and God bless. <3

Tuesday, November 20, 2012

In the Loop

A lot is going on around the Blanton house right now. Too much going to blog about all at once but here's a little sneak peek at two projects we are still in the middle of.

Can't wait to share with you all the finished projects! Happy almost turkey day!

p.s. I hope to be done with one before Thanksgiving and I have an announcement to make them so there should be another post up soon. Just busy but trying to keep you all in the loop :).

Tuesday, November 13, 2012

Out and About

Here's how we spent our veteran's day....
 Hubby and I decided to check out the well-talked-about historic shopping area of Charlottesville.
 It was bustling with life, street venues, and a well pulled together a mix of old and new.
Near the far end was a monument and tribute to the lost and killed civilians that died during the war in Afghanistan. 
What a great way to honor not just those in office who gave their lives but those who did not choose to put their lives on the line and still made a great sacrifice. Thank you to all those veterans and service men and women for protecting us and making it so this mass of shoes stays small!

So how did all of you spend Veterans Day? Anyone check out some new/old shops?


Monday, November 12, 2012

Thankful Jars

This year, for the month of Nov., the Hubby and I decided to do a little giving back to each other.
We made these jars which I like to call our "thankful" jars. I originally got the idea from the blog Fellow here, but instead of using just glue I used modge podge. I wanted a patchwork look and Hubby wanted a swirled look (he said we could use it for Christmas in a month and liked my snowflake-ish white branch fabric). So, instead of doing long strips and dipping them in glue such as Claire did, I coated the inside of the jars with the modge podge, cut out patches of like-colored fabric and layered them on. Make sure, if you’re doing this project, to push out all the air bubbles that get under the fabric. Then, I let it dry overnight and did a second coat over the fabric the next day. The second coat stiffens the fabric on the inside of the jar making it "sealed" so that the layers won't peel off down the road. 
Once our jars were done and dry, I just added some cute tags with our names on them (I blurred out the Hubbies for this post, I promise it doesn't really look like that :P). 
Then we got to the fun part... 

filling them! I use sticky notes and write on the back side of them so I can use the sticky part to make a sealed fold but you can use whatever you have on hand.
And here's my jar getting full! We are going to trade jars on Thanksgiving and read what each other has written.
Hope you all like the idea. If you are just making this, you can always play catch up for the notes or just make the jar for cute flowers (no water), cute straw holders or just a cute jar on the mantel. I do suggest NOT putting a candle in them as Claire did. It can cause the glue or modge podge to melt, the fabric to possibly burn (if you missed a spot on the second coat) and/or cause harmful fumes from the glue/modge podge; so yeah, not a good idea.

Happy almost Thanksgiving all! What are you thankful for this month?

Sunday, November 4, 2012

Button's First Photo Shoot

I just had to share this with you all as soon as I and Hubby got home! Here is the first photo of our darling Button! 
So I basically had a joy-crying fit through the entire ultrasound appointment.  We DID find out the gender and my sister, who was also there with us, was the first to find out and then tell us all (because I promised her a LONG time ago when we were little that she would be the first to know). We aren't spilling the beans until Thanksgiving though so that is when I will let you all in. For now, I just can't stop staring that the amazingly adorable little nose and pouty face. It’s so amazing to know that this little person is inside me and that God knows each and every day of its life, and how much love you can have for someone you have never met. We are so excited and can't wait until the 22nd to let you all in!

Friday, November 2, 2012

Starry Night Pumpkin

Over Halloween week, we spent our time unpacking and getting everything settled in (still at it actually -.-) so we weren't left with much space or time to decorate the house. What we DID get done was carving this darling pumpkin the day before Halloween! haha.
After drilling a ton of holes in it, Hubby and I decided that, even with Christmas lights stuffed into it, it just wasn't bright enough. So, we opted for a more 'starry night' look instead and letting out a bit more shine.
Once we drilled and carved (don't let the photo above be miss leading, I got my drilling and carving on too!) Hubby carved out a small hole in the back, close to the bottom, to put the light cord. We decided that using Christmas lights packed in worked best for this pumpkin. If you decide to make one like it (next year) make sure you only use outdoor safe lighting and watch the pumpkin. We only had ours on while I handed out cupcakes and candy but things like this can get overheated fast so it’s always good to keep an eye on it.

Here it is all finished, sitting outside... the street lights were a bit bright so it’s hard to see the shine but I think the pumpkin looks great.
Sorry for the blurry photo it was the best I got. Something about not wanting to be outside in the cold long enough to take a good photo -.- *sigh*.
So how was your Halloween? Anyone dress up to get candy for 'their kid' and then eat it all? Yep, so doing this next year! What was the best costume you saw? How about last minute pumpkin carving, anyone else?

Thursday, November 1, 2012

Adding to the Family

SURPRISE! we got a kitty!
 Actually, the kitty got us. She was a stray at our new apartment and actually ran up and attacked Hubbies leg when we were walking home from the fitness center. She would run up to us, attack our feet, cry, and then run and hide. So I got some of Peppers dog food and fed her some until she would stay with me, then I just picked her up. She bit me but then was surprisingly cuddly and sweet. She is so playful and I am so happy we got to rescue her, especially since I found out that her mother has two other kittens and isn't left alone and that at least one of them will survive the winter for sure. I heard the other two kittens crying during the storm we had and it made me feel so blessed to have a roof over our heads and a warm place to sleep every night. It’s just that much better to know that we could at least save one. :)

Here's a cute video of our sweet Nymorea (that's her name now) playing with my feet and a good view of my super massive belly. Ha-ha.

This is after I gave her a flea bath XD (just in case... she was a stray after all.).
So how have you all been? Anyone else thankful the storm is gone? any new family members?

Thursday, October 25, 2012

Homearama Take Two!

Remember last year when Hubby and I ventured out to Homearama with my sister and mom? Well, of course, we HAD to go again this year! Here's a bit of (unedited) eye candy from our little trip.
This year’s houses were built right by the ocean in Virginia Beach and BOY did they have nice views.

   I just love built-ins. There is just something so homey and classy about them. Even better, this built-in is right at the stair landing, making it perfect for a space-saving library or office (if you replaced the bench for a desk and slide in chair). How clever!
 What was more clever was the uses of this old stain glass window in the hallway (sorry this is the best photo I got of it Q.Q) to add the feeling of a window in a space that might feel too constricted or otherwise wouldn't be possible structurally. I think it adds a feeling of an extension to the space or "breathing" room.
 You could even add lighting behind it to cause the feeling of sunlight!
I super fell in love with this tile. It’s a little blurry of a photo but it has the texture or wood or burlap with the smoothness of sandstone! Sometimes it’s the small things that get me excited. Ha-ha.
 Hubby wasn't quite a fan of this idea but I just LOVE the cohesive look these books have thanks to a simple DIY slipcover curtsy of simple paper. I also think they would look great with brown baker’s paper or making a statement with some bright, bold, printed, craft paper.
 I found this rather clever. I'm sure it’s been done before but how beachy chic is this! These were tying back a bath curtain but it would be just as cute in a room to add that little vibe without overdoing it I think.
 THIS is how you work in a loud color. I love how they kept it simple with the white and didn't overdo it with the accent colors. It keeps the whole room feeling lights and breezy without feeling dizzy. Note to self, WHITE IS O.K... lol
 I wasn't actually a big fan of the chair itself but there is just something clever about using an old cane chair, adding a cute burlap (cheap) cushion, and some paint. BAM, awesome.
 Here's a closer look at that amazing texture. This pulls my heartstrings. <3
 This table was one solid HUGE slab-oh-wood; it also had a $4,000 dollar price tag. But, how great would this be to DIY with some distressed planks instead, for the cheeps?!
 (Sorry for all the blurry photos... not having a photo editor on our apartment’s office computer is really getting to me) Though my Darling was not a fan, I loved this wall to wall rag rug. Even better, you can make the same look by sewing together like-colored rag rugs to make one giant one. This one was big enough to fit wall to fall under a queen size bed!
Okay, so I know wall maps are being WAY overdone in houses nowadays, but I just love this wallpaper. Even better, it was used sparingly, just on one wall, to make it look like one big map instead of wallpaper. Cleaver.
 If anyone knows where to get this mirror, I NEED IT IN MY LIFE! that's it...
 And this one too. I actually really like this photo even unedited. Something about the lighting and the white on white. I could do without the "this way" sign though. :P
This vase is amazing. I had to share. No little tidbits. Just love.
 I actually really like this photo too. Even more, I love the floor to ceiling scalped tile. It almost reads as wallpaper but classier. It says "beachy" without overwhelming this small half bath. The frame-less, curvy mirror help to make things feel light also.
This was such a clever idea. I'm not sure how accessible it would be, but using the space on the side of the hood range, instead of just blocking it off, is so genius to me. I'm sure it’s been done before but how cool is that?!
   Well, that's it for now. I hope you all enjoyed the mini-tour.